Introduction
Have you ever dreamed of creating your own laser light show, projecting colorful vector graphics, or even playing classic arcade games on a wall with nothing but beams of light? A team of makers, known as [Breq] and [Mia], have shared a remarkably detailed and budget-friendly project that turns that dream into reality. Their RGB laser projector combines off-the-shelf components from AliExpress, an ESP32 microcontroller, and clever design to deliver stunning visuals—all while emphasizing safety and learning.

Project Overview
This DIY laser projector is a vector display, meaning it draws images by sweeping a laser beam so quickly that your eye perceives solid lines. The core technology relies on galvanometers (galvos)—precision mirrors that deflect the beam in X and Y directions. Unlike raster displays that scan line by line, vector projectors can create crisp, clean outlines of shapes, text, and even complex SVGs.
What sets this project apart is its focus on accessibility. The creators deliberately chose low-cost parts and provided thorough documentation, making it an ideal starting point for anyone curious about laser projection. The most expensive single component? The ANSI-certified safety glasses—a clear sign that safety was a top priority.
Key Components and Costs
Below is a breakdown of the main parts used, all sourced from budget-friendly AliExpress vendors:
- Galvanometer pair (rated at 20,000 points per second)
- RGB laser module with dichroic mirrors to combine red, green, and blue beams into one
- ESP32-S2 microcontroller (includes a built-in DAC for analog galvo control)
- Custom PCB with audio input for Lissajous patterns or oscilloscope music
- Power supply and enclosure
The budget was kept low—total cost excluding safety glasses is roughly $100–150. This makes it one of the most affordable entry points into serious laser projection.
How It Works: From Digital Design to Laser Lines
Vector Graphics Basics
Instead of scanning every pixel, a vector projector uses galvos to steer a continuous laser beam along the path of lines. The beam turns off when moving between shapes, so only the desired lines appear. For smooth results, the galvos must move fast enough—this build tops out at 20,000 points per second, sufficient for moderate-complexity images.
The Brain: ESP32-S2 and DAC
The ESP32-S2 is a powerful, low-cost microcontroller that includes a digital-to-analog converter (DAC). This is critical because galvos require analog voltage control. With two DAC channels, the ESP32 can drive both X and Y galvos directly, eliminating the need for an external DAC board. The microcontroller also handles input from Wiimote controllers (for games like Asteroids), text rendering, and SVG parsing.
Audio Input for Classic Lissajous Patterns
The custom PCB includes an audio input jack, allowing you to feed stereo audio signals to the galvos. This enables classic Lissajous lightshows and oscilloscope music—a fun retro feature that requires no programming.
Fun Extras: Games, Clocks, and SVG Projection
One of the project’s most exciting features is the ability to play Asteroids using Nintendo Wiimote controllers. The vector display is a perfect match for the game’s original line-art graphics. Beyond games, the projector can:
- Display a vector clock that shows the time with clean, glowing lines
- Render text input in various single-stroke fonts (great for announcements)
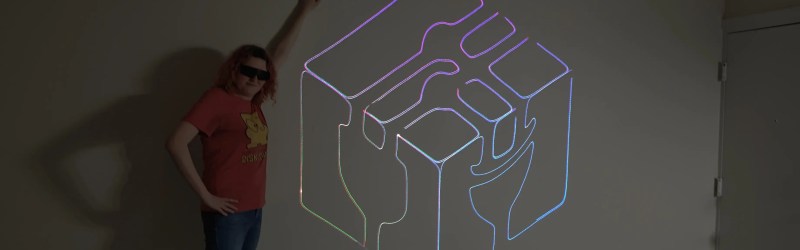
- Project any SVG image that doesn’t exceed the galvos’ point budget—simply upload an SVG and watch it come to life
Remember that the 20k points/second limit means complex images with many lines may flicker. The creators recommend designs with under 500–1000 points for smooth results.
Budget and Performance Tradeoffs
The 20k points/second galvos are a deliberate choice to keep costs low. Higher-speed galvos (e.g., 60k points/second) can cost ten times as much. For most hobbyist projects, this speed is adequate—especially for simple shapes or games. If you need a higher refresh rate for complex graphics, you can upgrade later, but the rest of the design (ESP32, DAC, laser module) remains compatible.
Documentation and Learning: Why This Project Stands Out
The creators, especially [Breq], didn’t just provide a parts list and schematic. They explained why each design decision was made—from choosing an ESP32 over a dedicated laser controller board to using dichroic mirrors instead of a single RGB laser. This makes the project an excellent educational resource for understanding laser projection fundamentals. The write-up covers safety protocols, calibration steps, and software code that you can adapt.
If you’ve been considering building a laser projector, this guide offers a low-risk, high-reward starting point. The combination of low cost, excellent documentation, and versatile functionality makes it a standout in the DIY laser community.
Conclusion
Building your own RGB laser projector is more accessible than ever, thanks to this well-documented project. With a budget-friendly parts list, a focus on safety, and creative features like game controllers and SVG projection, it’s a perfect weekend build for anyone fascinated by light, electronics, and interactive art. So grab your safety glasses, order those parts, and start projecting Asteroids on the living room wall.
For more information, check out the components list or jump to the fun extras section. Don’t forget to send your own bright ideas to our tips line!