Overview
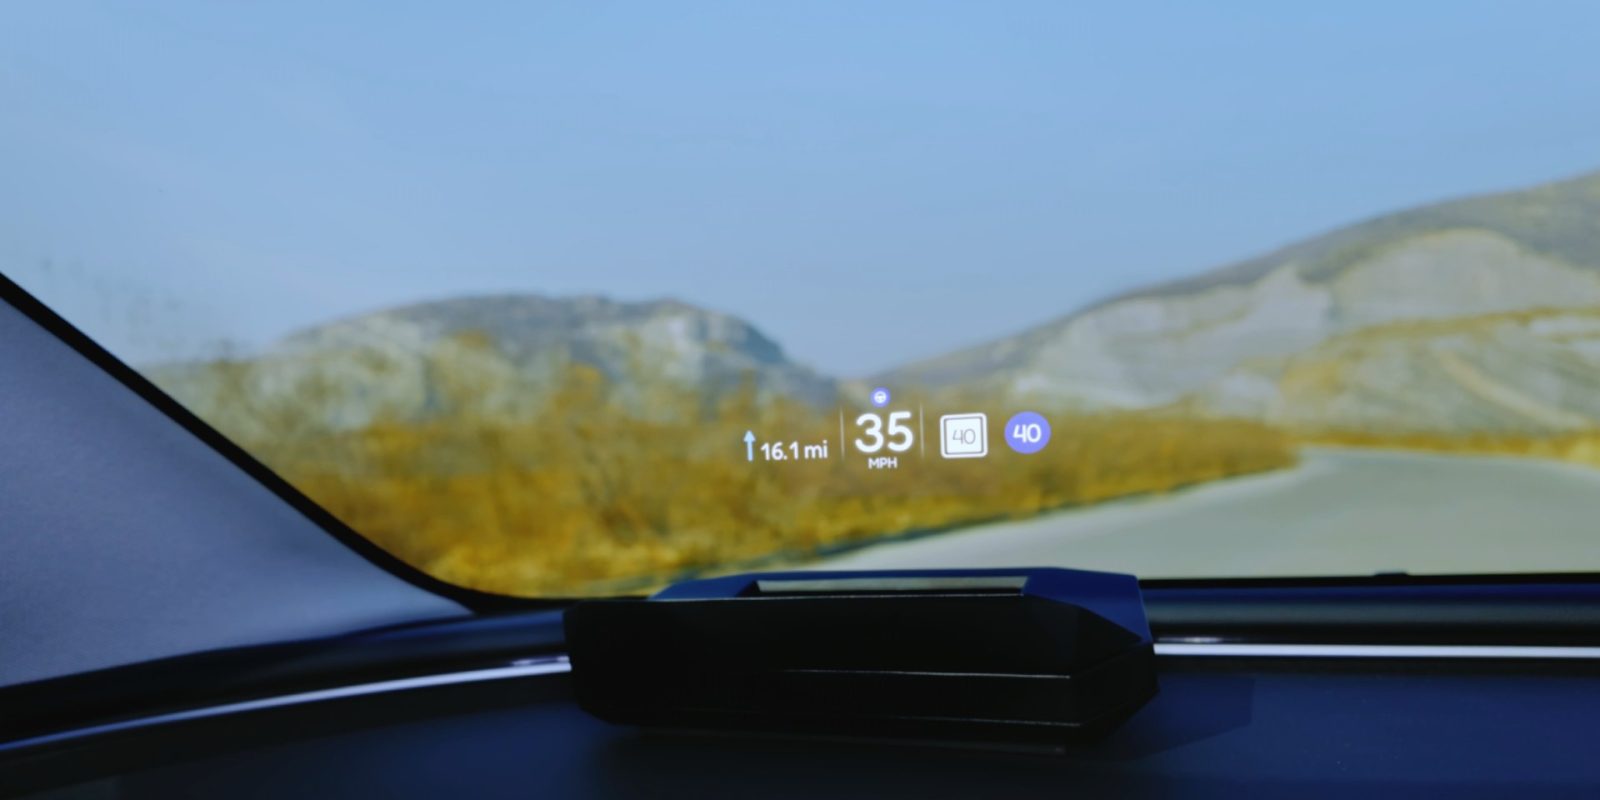
For years, Tesla owners have debated the absence of a traditional instrument cluster. While the minimalist center screen appeals to some, many drivers still crave critical driving information—speed, navigation, alerts—directly in their line of sight. Enter NeuroHUD, a startup that claims to deliver the heads-up display (HUD) Tesla forgot. Designed exclusively for Tesla vehicles, NeuroHUD projects essential data onto the windshield, allowing you to keep your eyes on the road. The product generated over $400,000 in its first 72 hours on Kickstarter, proving the demand is real.
This guide will walk you through everything you need to know about installing, configuring, and using NeuroHUD. Whether you’re a Tesla enthusiast or a tech-savvy driver, you’ll learn how to transform your driving experience with a true HUD that integrates seamlessly with your car’s navigation and alert systems.
Prerequisites
Before diving into installation, ensure you have the following:
- Compatible Tesla Model: NeuroHUD is built for Tesla Model 3, Model Y, Model S (2021+), and Model X (2021+). Check the product page for specific compatibility notes.
- Smartphone with the NeuroHUD app: The unit connects via Bluetooth to your phone for initial setup and firmware updates. Android (6.0+) or iOS (12.0+) required.
- USB‑C power source: The HUD draws power from your Tesla’s USB‑C port (center console or rear). A USB‑C to USB‑C cable is included.
- OBD‑II dongle (optional): For some advanced data (e.g., battery voltage, tire pressure), an OBD‑II Bluetooth adapter may be needed. The HUD has a passthrough port, so your existing OBD‑II scanner can still be used.
- Clean windshield: Any dirt or film will reduce projection clarity. Use a microfiber cloth and glass cleaner before mounting.
- Basic tools: A trim removal tool (plastic) is handy for routing the cable, though most installations don’t require removing panels.
Step‑by‑Step Installation Guide
Step 1: Prepare the NeuroHUD Unit
Remove the HUD from its packaging. It consists of a projector module (about the size of a smartphone) and a slim reflective film (optional, for improved image clarity). The projector has a protective film on the lens—peel it off gently. Download the NeuroHUD app from your app store, create an account, and follow the in‑app pairing instructions.
Step 2: Choose the Mounting Location
NeuroHUD mounts on the dashboard directly behind the steering wheel, aligning with the driver’s forward view. For Tesla Model 3 and Y, the ideal spot is the small flat area near the windshield edge. The unit adheres with a strong 3M VHB pad (included). Important: Select a spot where the projected image sits just below your normal line of sight, not overlapping the windshield’s black frit area. Test‑place the unit without peeling the adhesive to ensure the reflection is crisp.
Step 3: Mount the HUD
Clean the dashboard surface thoroughly with the included alcohol wipe. Let it dry for 2 minutes. Peel the adhesive backing from the HUD’s base and press firmly for 30 seconds. Avoid pressing on the lens. If you plan to use the optional reflective film, apply it to the windshield in the projection area now—follow the separate instructions for bubble‑free application.
Step 4: Connect Power
Route the USB‑C cable from the HUD to a power source. For a clean look, tuck the cable along the dash seam using a trim tool. Connect to a USB‑C port in the center console (Model 3/Y) or the glovebox (Model S/X). The HUD will power on automatically when your Tesla is awake (you may need to sit in the driver’s seat and tap the brake). You’ll see a brief startup sequence with the NeuroHUD logo.
Step 5: Pair with the NeuroHUD App
Open the app and tap “Add Device.” The HUD will appear as “NeuroHUD-XXXX.” Accept the pairing request. Once connected, the app will walk you through a calibration routine: adjust the image position, brightness, and tilt using on‑screen sliders. The app also checks for firmware updates—install any available updates before continuing.

Step 6: Configure Display Preferences
Within the app, you can choose which information to show: speed (digital), navigation turn‑by‑turn (from Tesla’s native nav or via Apple/Google Maps), energy consumption, autopilot status, door alerts, and more. Toggle what matters most for your drive. You can also adjust the HUD’s color scheme (white, amber, or blue) to reduce glare at night.
Step 7: Test the Integration
Start your Tesla and take a short drive. The HUD should sync automatically. Verify that speed and navigation data match the center screen. If you notice lag or missing alerts, check that the HUD’s Bluetooth connection is stable. For navigation, ensure your phone’s location services are on and that the NeuroHUD app has permission to access Tesla’s vehicle data (via the Tesla API, which you authenticate in the app settings).
Step 8: Advanced Features (Optional)
With the OBD‑II dongle (sold separately), you can enable additional metrics like battery percentage, tire pressure, and regen power. Insert the dongle into your Tesla’s OBD‑II port (located under the steering column, left side). Pair it via the app, then add the new data fields to the HUD’s layout. This step is recommended for maximum insight, but not required.
Common Mistakes and How to Avoid Them
- Mounting too high or too low: If the projected image appears blurry, the HUD is likely not aligned with your eye line. Re‑mount slightly higher or lower. Use the app’s calibration test to fine‑tune.
- Reflection doubling: Without the reflective film, the image may reflect off both the inner and outer windshield surfaces. Apply the film exactly in the projected area to eliminate ghosting.
- Power cable tension: Pulling the cable too tight can dislodge the USB plug or damage the port. Leave a small loop near the HUD for slack.
- Firmware not updated: An outdated firmware may cause connectivity drops. Always run the app’s update check after pairing.
- Forgetting to disable “Auto Brightness” on the HUD at night: While the HUD auto‑dimms, some users find it still too bright. Manually lower brightness in the app before long night drives.
- OBD‑II interference: If you use an aftermarket scanner, it might conflict. Use NeuroHUD’s passthrough cable or unplug the scanner during HUD use.
Summary
NeuroHUD brings the missing instrument cluster to your Tesla, projecting navigation, speed, and alerts directly onto the windshield. Installation takes about 30 minutes, with no permanent modifications required. The HUD relies on a USB‑C power connection and Bluetooth pairing with the NeuroHUD app for setup and customization. For best results, mount the unit carefully, apply the reflective film, and keep firmware up to date. With over $400,000 raised in its first 72 hours, this is a solution that clearly resonates with drivers who want critical info always in their line of sight—making it a worthy upgrade for any Tesla owner.